Welcome to the second Episode of the AWS Free tier series. This is going to be part one (total three parts), where we are going to build our PBX carcass based on free AWS EC2. The goal of this episode is to show how you can leverage AWS environment in full throttle and get super handy services for your daily usage. We will be using EC2, S3, DynamoDB for building robust and very very secure telephony system.
Let’s get started!
Available free resources for our task #
First of all, let’s make it clear and understand what is available in free tier as compute for us. Since we need three mentioned above, let’s see how exactly they are available in free tier mode.
AWS EC2 free tier #
EC2 is a virtual machine in the cloud and it is 12 month free tier since sign up! If you want to use this article with your free tier EC2, make sure you have either new account or account, where free tier is still available. EC2 free tier gives us 750 hours per month of Linux, RHEL, or SLES t2.micro instance usage or 750 hours per month of Windows t2.micro instance usage. This means that we can spin up operation system in the cloud for 12 month for free! Awesome. From these two options we are going to use Amazon Linux (ami-760aaa0f) in eu-west-1 (Ireland).
AWS S3 free tier #
Since we want to make records of our calls, in combination with local storage of EC2 (which is 30 Gb with AWS free offer), we will use S3 5 Gb free storage for that as well. Total gives us 35 Gb excluding OS size (Amazon Linux). However free tier is pretty flexible and offers you to make large disk size (root volume) or even attach extra volume to our instance and use that space. In this case we will be charged for our EBS volume. Just keep in mind that 30 GB of Amazon Elastic Block Storage in any combination of General Purpose (SSD) or Magnetic, plus 2 million I/Os (with EBS Magnetic) and 1 GB of snapshot storage is available for us for the first month (EBS or Elastic Block Storage is your disk).
AWS DynamoDB free tier #
For the call records (stats) we will be using DynamoDB (noSQL) service, which is 25 GB of Storage, 25 Units of Read Capacity and 25 Units of Write Capacity – enough to handle up to 200M requests per month with Amazon DynamoDB. For our thing it is more than enough.
Setting up Asterisk 15 IP/PBX #
I am going to launch new instance and want to use user data section (do something on EC2 launch) in order to make the process faster without my intervention. Feel free to re-use the following snippet to seed your instance with Asterisk 15. If you need earlier version for any reason (for example you are more familiar with it), check Asterisk download page and do not forget to make adjustments in the below snippet (path to download). Downloads of Asterisk are available at https://downloads.asterisk.org/pub/telephony/asterisk/. The currently supported versions of Asterisk will each have a symbolic link to their related release on this server, named asterisk-{version}-current.tar.gz.
 1#!/bin/bash
 2
 3cd /usr/local/src/
 4wget https://downloads.asterisk.org/pub/telephony/asterisk/asterisk-15-current.tar.gz
 5tar zxvf asterisk-15-current.tar.gz
 6cd /usr/local/src/asterisk-15.1.2
 7cd contrib/scripts
 8./install_prereq install
 9cd ..
10./configure
11make
12make install
13make samples
14asterisk
This should give us installed and launched PBX.
Securing PBX with security group #
We are going to use our telephony system with the DID (for incoming calls) SIP phone (we) which is dynamic every time! But we don’t want to open EC2 to the world, instead, we want to keep few ports open for the provider (SIP + UDP range for voice). In order to do this, let’s select security group and add few ingress rules.
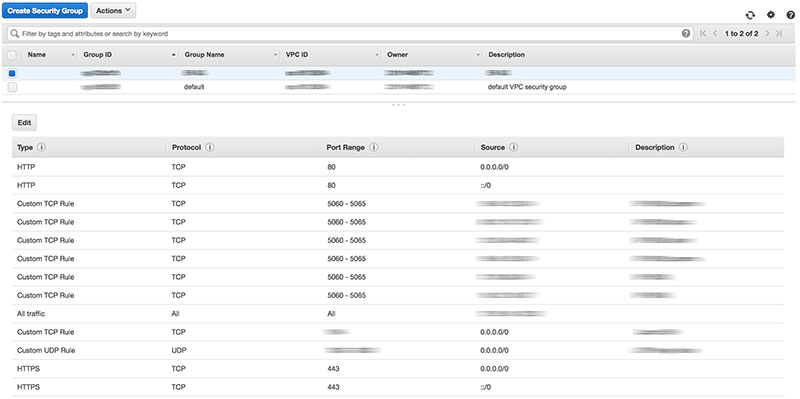
We want to authorize 5060-5065 range for our DID provider (I am using Sipnet) and range of UDP ports (you can configure it in rtp.conf with two lines rtpstart=10000 and rtpend=20000 (Defaults are rtpstart=5000 and rtpend=31000). You can change them if you want (make sure you have this range set in UDP rule then).
You can also consider fail2ban in order to make it securer, but I prefer to exclude things I don’t really need!
Adding endpoints dynamically #
All is good except one thing! We want to make calls using our telephone application (macOS), but we don’t have any rules setup in security group for us (since we are on dynamic IP everytime). In order to deal with this we can use the below snippet (you need AWS CLI installed on your mac and you need to make sure you can talk to EC2 Security Group part with your user permissions).
 1#!/bin/bash
 2
 3export sg="sg-you-group-goes-here"
 4export protocol="all"
 5export cidr="$(curl -s http://checkip.amazonaws.com/)/32"
 6export CURRENT_MYIP="$(launchctl getenv CURRENT_MYIP)"
 7
 8aws ec2 revoke-security-group-ingress --group-id $sg --protocol $protocol --cidr $CURRENT_MYIP/32
 9aws ec2 authorize-security-group-ingress --group-id $sg --protocol $protocol --cidr $cidr
10launchctl setenv CURRENT_MYIP $cidr
Save it on your desktop and make right click and open with “Terminal App”. The following occurs with your ingress security group settings:
- Revoking of existing ingress entity (previously setup by this script or manually);
- Authorizing new one based on
cidrvalue (it is based on your current public IP); - Setting up
CURRENT_MYIPvariable to reuse next time for re-setting dynamic IP;
Now, with the following sip.conf we should be good to make calls!
 1
 2[user]
 3type = friend
 4host = dynamic
 5defaultuser = user
 6password = password
 7allow = all
 8qualify = yes
 9context = default
10canreinvite = no
11nat = force_rport,comedia
Appendix #
That’s it for the episode. We have setup our carcass for IP/PBX based on Asterisk 15. We have added few rules to secure our system (except SSH and other management things, we will polish in the next part). But for now the system is clean and ready for the next adventure!
Thanks!