Some time ago I wrote about Linux agent from CloudBerry Lab. This time I want to pack all together and show advanced capabilities of AWS.
When we launch AWS EC2 (compute instance in the cloud) we may want to have something pre-installed (or pre-done) before we get into this VM and start working. Let me give you an example. I do launch instances with Linux OS quite often for various reason (customer’s demo, testing applications, testing software etc) and I want to have number of steps without my intervention after launch. To be precise I need my software installed when I SSH into my either CentOS or Debian. Think wide now, don’t be locked in my software. Use anything you’d love to have. Well this is good article on how to have PHP installed. In my article I’d like to have CBL for Linux installed with storage configured and backup plan scheduled. Sound cool, right? Let’s do it.
Command Line steps #
We just need the following things:
- Update system and Linux distributive (well, this is optionally, but I still prefer to do this since I want to make sure I have all security patches and fixes applied to my system)l
- Change directory my
~(I will do Ubuntu 16.04 out of marketplace of AMI), so I will be working withubuntuuser-name; curlbinaries from vendor’s website;- Install using package manage (dpkg);
- Setup storage account (using software’s CLI);
- Add default backup plan (same as above, CLI) with schedule.
Sounds clear. Here is my script example for AWS EC2 user data:
 1#!/bin/bash
 2sudo su
 3passwd ubuntu << EOF
 4Pa$$w0rd
 5Pa$$w0rd
 6EOF
 7apt-get update -y
 8cd ~
 9curl -# -o cloudberry-backup.deb \
10	-F "__EVENTTARGET=" \
11	-F "prod=cbbub1214" \
12	https://www.cloudberrylab.com/download-thanks.aspx
13dpkg -i cloudberry-backup.deb
Let’s take a look at the above snippet closer. We elevate permissions to root and change password for our default user ubuntu to Pa$$w0rd. We then proceed with system updates and jump into our home directory for binaries download. My curl command gets binaries from CloudBerry Lab website. Finally I install my package using dpkg default package manager! This should be enough to have CBL Backup for Linux installed when EC2 launched. In order to manage it through CLI change your directory to cd /opt/local/CloudBerry Backup/bin/ and pick any of the below attributes:
 1./cbb
 2CloudBerry Backup Command Line Interface started
 3CloudBerry Backup Commands Help:
 4
 5 addBackupPlan      - Create a new plan to backup files to cloud storage
 6 addRestorePlan     - Create a new plan to restore files from cloud storage
 7 editBackupPlan     - Edit an existing backup plan
 8 editRestorePlan    - Edit an existing resetore plan
 9 getPlanDetails     - Get plan details
10 plan               - Run custom plan now | list plans
11 changePlanState    - Change state
12 deletePlan         - Delete plan
13
14 addAccount         - Add backup destination storage
15 editAccount        - Edit account
16 deleteAccount      - Delete account
17 account            - Account list
18 option             - Set default option
19
20 sendLog            - Send Error Report
21
22 saveLog            - Save Error Report
23
24
25 exportConfig       - Export backup configuration to the specific file
26
27 importConfig       - Import backup configuration from the file
28
29
30 version            - Version
31
32 activateLicense    - activate license
33 releaseLicense     - release current license
Start with ./cbb activateLicense -e email -t "ultimate/pro" for example. This is trial license request, check official command line interface user guide for further details.
CloudBerry Backup web interface #
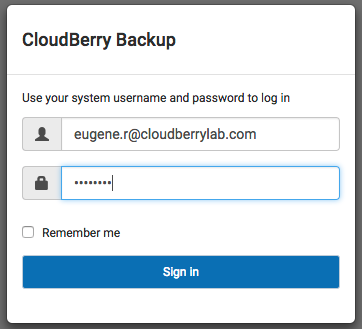
With release of CBL for Linux 2.1 it comes with web interface what significantly simplifies product management. Make sure you have 43210 port available (check your security group for your EC2). You can change this port later in the UI. If it is available, open up your favorite browser and type IP-of-your-EC2:43210. This should bring you to the login page, where you should use your system user name and password (ubuntu and Pa$$w0rd).
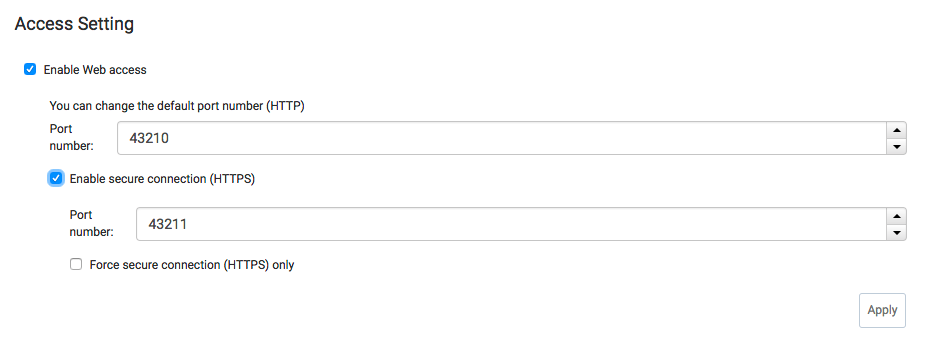
Now, if you’d like to change default ports to something else, check this part of options:
That’s it! Hope it helps someone with EC2 protection!
Appendix #
If all above did not make anything, you may want to troubleshoot your script by checking logs (of course you need SSH into this instance). Logs are in /var/log/. This is what I usually do (since system update may take some time I have enough time to SSH and do tail):
1tail -f /var/log/cloud-init-output.log
If you need the same for Windows, please do check this article.