👉 This post was written in 2017. I am sure there are much better ways to arrange static web site. For instance I recently posted the following article: Static web site on Azure with Azure DevOps and Bicep which you may want to check! ✌️
Q: What is static website? A: It is website without dynamic data.
A: What is dynamic data? Q: Well, it is data that can or can’t be changed due to user’s (visitor) interactions, user’s (visitor) location, some internal conditions (for example whether conditions, currency exchange rate) and so-on.
A: When do I need static website? Q: Well, you probably don’t need it at all. From my perspective static website is great decision if you keep something in the Internet with no frequent changes. For example, you need company’s website, but you don’t really have many news and information that you need to share on daily / monthly basis. You just need it, because others have it. Well, you just need it because you need to show your contact details and explain what you do.
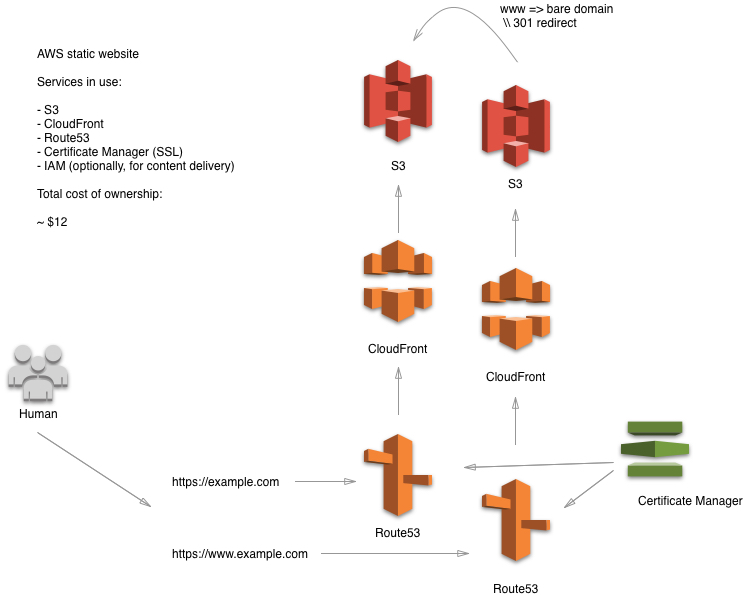
Let’s go ahead and do static website with almost no cost (just domain registration fee if you don’t have your domain). This is what we are going to build.
Prerequisites #
In order to build your personal static website you will need the following:
- AWS account (even free tier will work);
- Registered domain (if you don’t have it, don’t worry, we will walk through this in AWS console);
- Sample website files (if you don’t have it, don’t worry, we can create sample, you can update your content later);
- Basic knowledge on AWS. I would suggest to check fundamentals of AWS;
- Mail service for enabling MX records and receiving emails for your domain (e.g. gmail, yandex or any other of your choice).
S3 with Static Website Hosting #
Go to “S3” section of your AWS console and create two buckets, - “example.com” and “www.example.com”. Now let’s enable static website service on each domain by typing on “Static Website Hosting” and selecting actions, that we want to perform on ether show files from the bucket or redirect to another bucket. It does not really matter where you store your bucket, since we will be using CloudFront for caching data across entire world through edge locations of AWS.
So if we plan to serve our website’s content from naked domain, setup your “example.com” accordingly by pointing it’s configuration to index and error files. Another bucket (“www.example.com”) should be configured with “Redirect requests” to naked domain.
One more important settings that we need to place to our new buckets - bucket policy since we want to have all new data automatically have public access. Let’s add this policy in “Permissions” -> “Policy”:
 1{
 2    "Version": "2012-10-17",
 3    "Statement": [
 4        {
 5            "Sid": "PublicReadGetObject",
 6            "Effect": "Allow",
 7            "Principal": "*",
 8            "Action": "s3:GetObject",
 9            "Resource": "arn:aws:s3:::example.com/*"
10        }
11    ]
12}
Make sure you use this policy for both buckets, but change Resource part accordingly for “www” bucket. There is good AWS article about it.
S3 configuration is done, let’s move to CloudFront now.
Amazon Certificate Manager (ACM) for SSL #
Since we want to access our website using HTTPS protocol, let’s get SSL through ACM (Amazon Service). This is free service, so you don’t have to worry about additional costs in your monthly billing. Make sure you request for both naked domain and your subdomain (I used asterisk symbol to have all my further subdomains SSL’ed by default). At least I’ll need it for “www” and “mail” zone. You will need to configure “admin@domain” email in order to confirm this action. You can use of the free service for mail (I have short instruction down below in Route 53 section of this tutorial).
CloudFront configuration #
Now when we have our S3 buckets, SSL certificates we can start to create new distributions for serving our static website globally. Jump to CloudFront section and create two distributions.
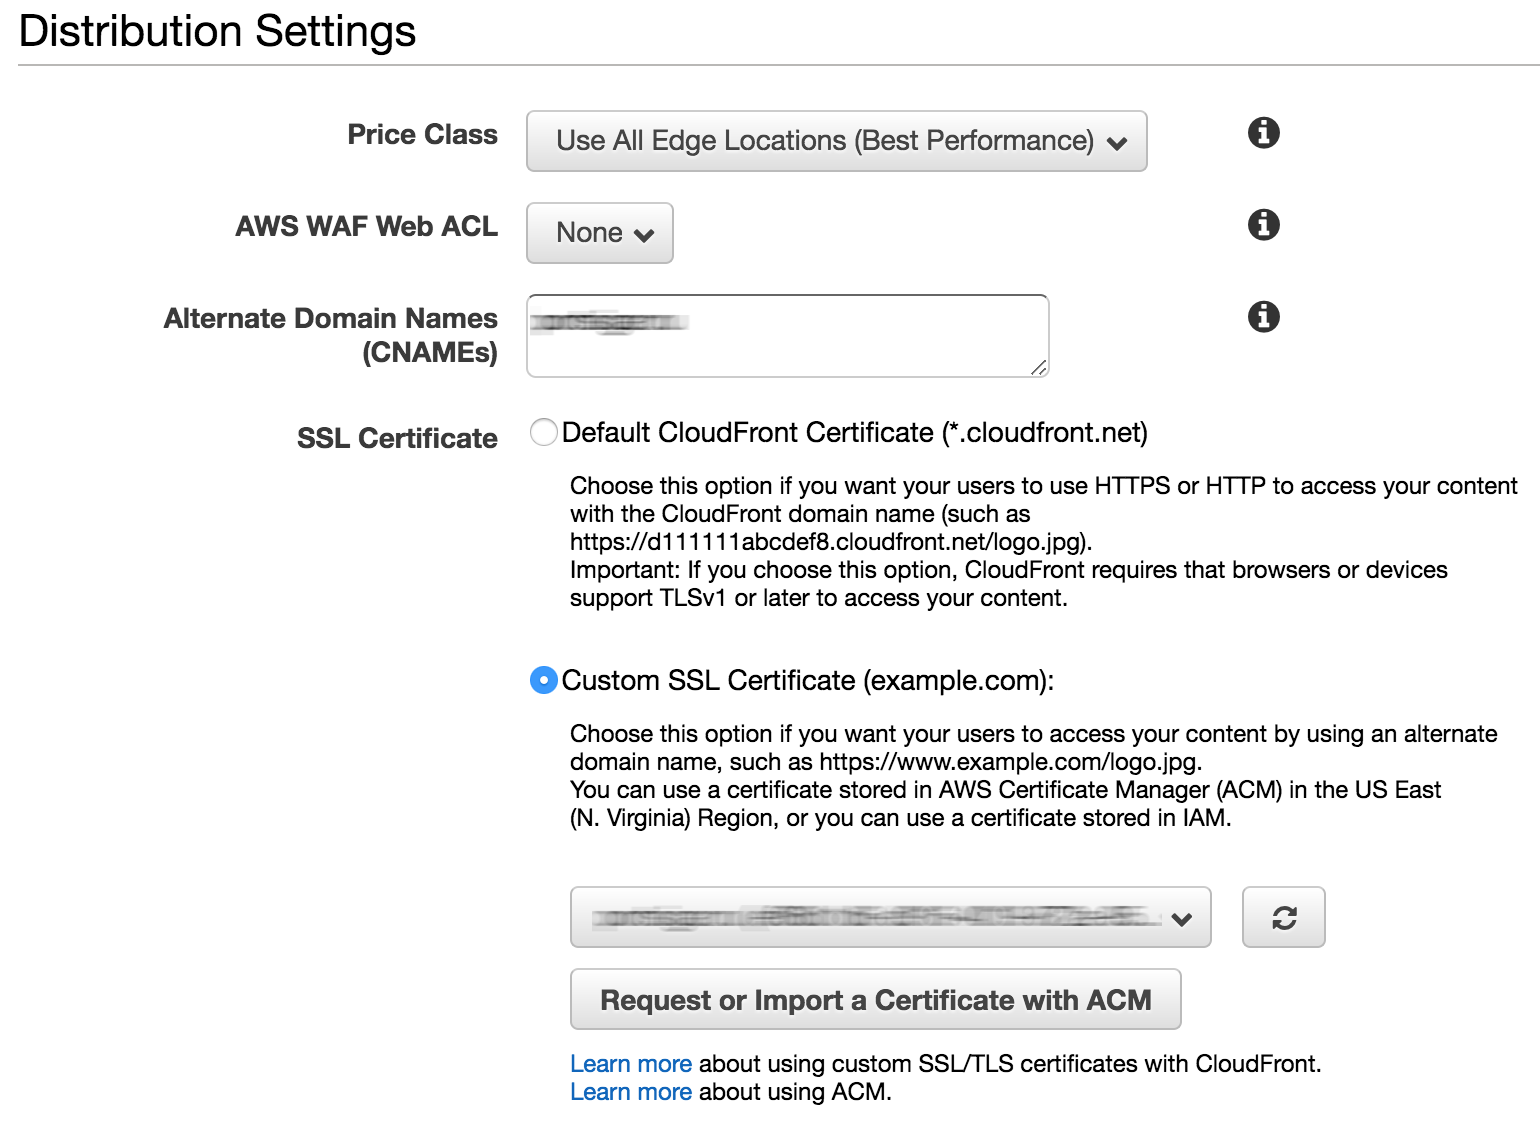
Make sure you have CNAME with your domain name and pick your ACM SSL cert from the drop down section “Customer SSL Certificate”.
The most important part here is “Origin Domain Name”. Make sure you don’t go your bucket name from list, instead, copy and paste your endpoint. It should be something like this: your-domain.s3-website.region.amazonaws.com. Make sure you have CNAME and Origin Domain Name fit each other.
Amazon Route 53 and public hosted zones #
Whether you have or not your own domain, sign in into your AWS console and jump to “Route 53” section where we are going to configure our domain records (and register new domain if you don’t have it yet).
Domain registration #
Let’s register our domain by going to “register new domain”. If you have yours, just skip this part.
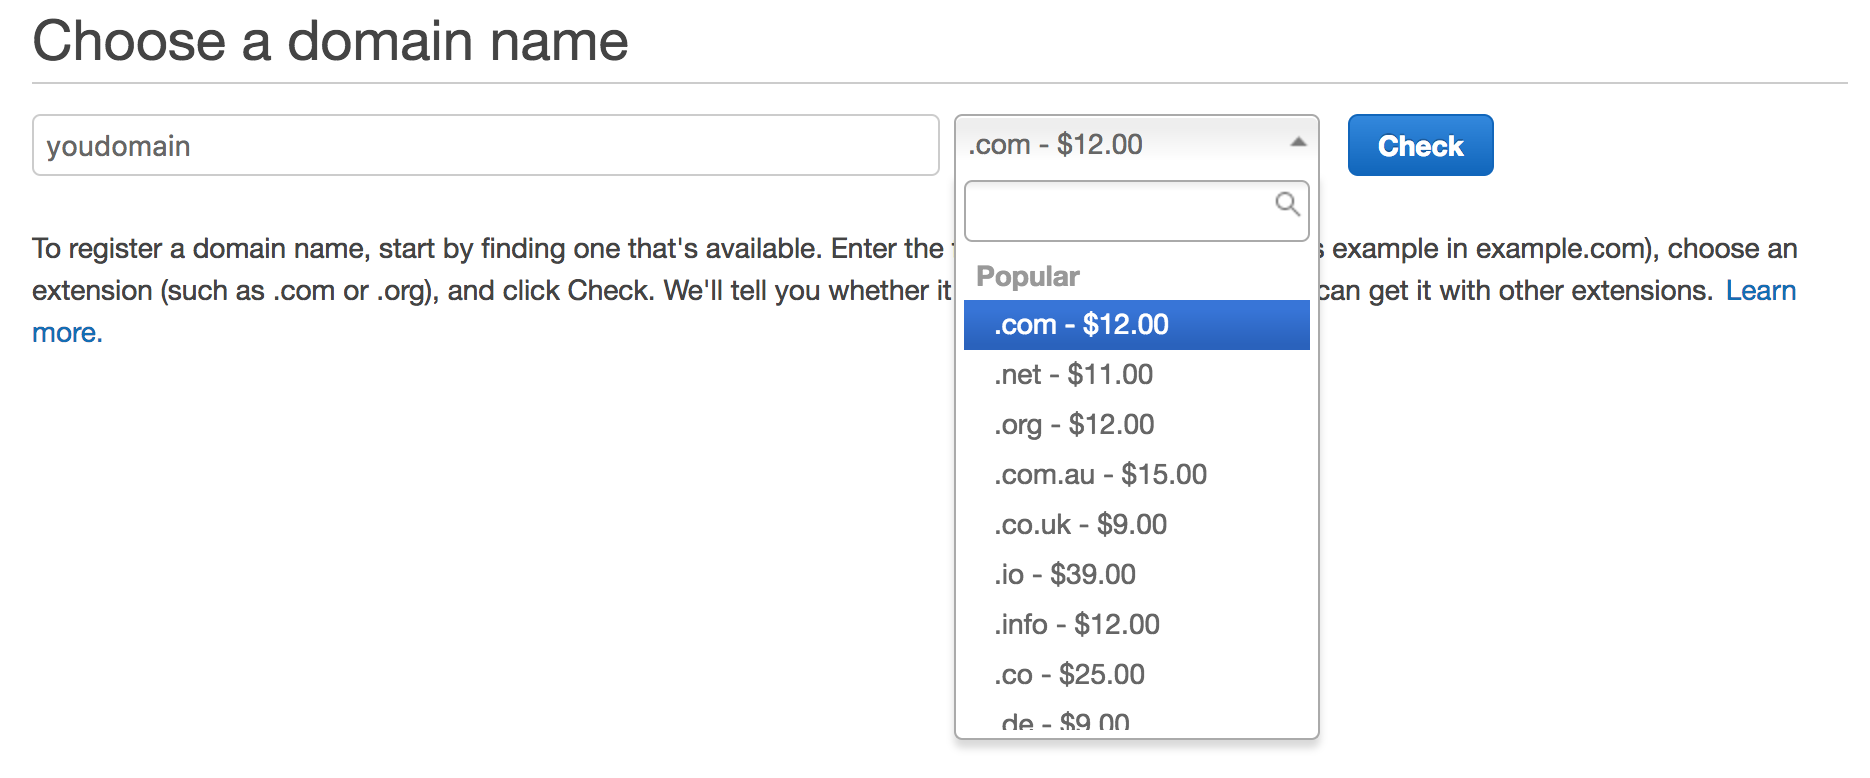
Domain registration should be straight forward, so I skip this part. At the end of this you should be able to see your domain in “Registered domains” section.
NS configuration #
Now, let’s jump into “Hosted zones” and add our new domain. Since we want everybody access our website, let’s put “Public Hosted Zone” in it’s type. Click “create” and you should be in your zones configuration. We need to grab NS records and point our domain to those records whether you have domain registered through AWS or through domain registrator. Usually you are looking at four NS records something like the below:
1ns-111.awsdns-44.com.
2ns-2222.awsdns-33.org.
3ns-3333.awsdns-22.net.
4ns-4444.awsdns-11.co.uk.
Don’t forget to grab “.” (dot) at the end of each zone since it is required.
A zones configuration (both naked and www) #
We want to use CloudFront for our A zones. Let’s “Create Record Set” and select “A - IPv4 address” and set “Alias” to “Yes”. You can select from drop down field target that you want to use. In our case we have two CloudFront distributions and we want to setup naked and www zones. Don’t mix them up. Decide which one you want to redirect (www -> naked or vise versa). See my example for www below:

At the end of this configuration we need two “A” records, - for naked domain and www.
MX and CNAME (optionally) for mail services #
For the sake of this tutorial I used Yandex mail service (free). You just need to add your domain and set MX record. If you’d like to get personal mail.something.domain address to access web-interface for mail check, add CNAME record to point to domain.mail.yandex.net.. MX record is super simple as well, just use 10 mx.yandex.net. in your MX record value. That’s it, proceed with domain validation in pdd.yandex.ru and start making your mailboxes. One of the mailbox you’ll need later is “admin@domain” for ACM approval.
Website content #
Final step here is upload your “index.html” and “error.html” files to primary bucket (depends on which way you do redirect). You can do this either with AWS CLI, s3_website, CloudBerry Explorer or even through web console.
Now, try to check your www, non-www, https, http etc. You should be able to see your content from the only address, which is good for SEO!
That’s it. If you have any questions - welcome to the comments!